Najważniejsze wskazówki dotyczące wybierania wszystkich na zdjęciach iCloud
Autor: Vernon Roderick, Ostatnia aktualizacja: 2 czerwca 2020 r
The average iCloud storage can only store a limited amount of photos. That is why many users are now finding a way to manage their photos more efficiently. One of the most effective ways to do that is by transferring their photos elsewhere.
However, this cannot be done if they don’t know how to Select All in iCloud Photos in the first place. Alas, this function was not available in the earlier versions of iCloud.
W tym artykule pokażę how to Select All in iCloud Photos and what you can do upon doing so. Remember that this is only a recent development in the iCloud platform, so it would do you well to focus.
Part 1: How to Select All in iCloud PhotosPart 2: How to Deselect in iCloud PhotosCzęść 3: Wniosek
Part 1: How to Select All in iCloud Photos
Before you can do anything to your photos, you have to select them first. Now I have noticed users with lots of photos complaining about why they can’t select the iCloud photos all at once. This is because, for the past couple of years, there has never been a feature that allows them to do so. However, it has now become possible to learn how to Select All in iCloud Photos.
Since there are two ways to access the iCloud platform, we will discuss the steps separately.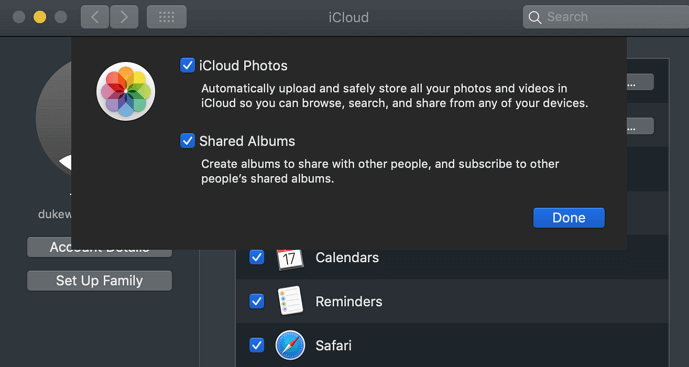
# 1: iCloud.com Website
The first platform would be the iCloud.com website. Learning how to Select All in iCloud Photos through this platform would be suitable if you only have less than 1,000 photos. This is because the Select All function can only accommodate that many photos at once. With that said, here are the steps you need to follow:
- On your computer, go to the opcji binarnych stronie internetowej.
- Log in to the iCloud account you usually use by entering your Apple ID along with the password.
- Once you get on the platform, click the Photos option.
- Zostaniesz zabrany do iCloud Zdjęcia section where a list of photos will be stored. Now what you want to do is click on the first photo on the selection panel.
- Once the photo is selected, press and hold the keys przesunięcie, Ctrl, Alta the same time and then press Strzałka w dół
Uwaga: If you don’t want to press these keys, you can simply press only Shift and select the last photo after scrolling down up to the bottom.
You have now learned how to Select All in iCloud Photos on the iCloud.com website. If you are facing some issues, then perhaps it is because the number of photos exceeds 1,000. In that case, you will want to look for another option.
# 2: iCloud App
The second method and perhaps the only way to select more than a thousand photos at once would be to use the iCloud dla Windows app. As the name suggests, this is only applicable to Windows PC. If you use the iCloud app on Mac, then there is a huge chance that this function doesn’t exist. Before anything else, here’s how you can set up the app so that iCloud Photos would be available.
- Pobierz iCloud for Windows app on your computer.
- Open the app once the download ad installation is complete.
- Sign in to your iCloud account with your apple ID and password and click on Zaloguj.
- When setting up the app, make sure the option for Grafika sprawdzone.
- Kliknij na Opcje ... the button beside the Photos option.
- Now check the box for the iCloud Photo Library.
- Kliknij na gotowy , a następnie zastosować.
This will start the synchronization of the photos from the iCloud platform into the iCloud for Windows app. Now a folder should be created by now which will be the highlight of this section. Here’s how to Select All in iCloud Photosusing this platform:
- Open a session of File Explorer on your computer.
- At the left panel, click on the iCloud Zdjęcia folder which should be available now that you have set up the iCloud app.
- Teraz otwórz Do pobrania
- You will see a list of photos. Simply press Ctrl + to select all items. You may also do what you usually do when selecting all files on your Windows PC.
As I have said, you can select all photos at once without any limit. Even if there are tens of thousands of photos, it should all be included. The only problem with the iCloud for Windows app is that your PC should be compatible with the latest version. This is because the latest versions are the only ones with this function.
Any older versions won’t be able to help you on how to Select All in iCloud Photos.
# 3: iOS Data Recovery Software
As I have mentioned earlier, only a handful of devices will have the Select All function on iCloud, mainly because some versions aren‘t compatible. That is why you will find that you won’t have any choice but to use specialized software. And for that, I recommend Odzyskiwanie danych FoneDog iOS.
Darmowe pobieranieDarmowe pobieranie
FoneDog iOS Data Recovery is a tool that is used for recovering deleted files from iOS devices. However, more than that, it is able to extract files such as photos all at once. Now here’s how to Select All in iCloud Photos za pomocą tego narzędzia:
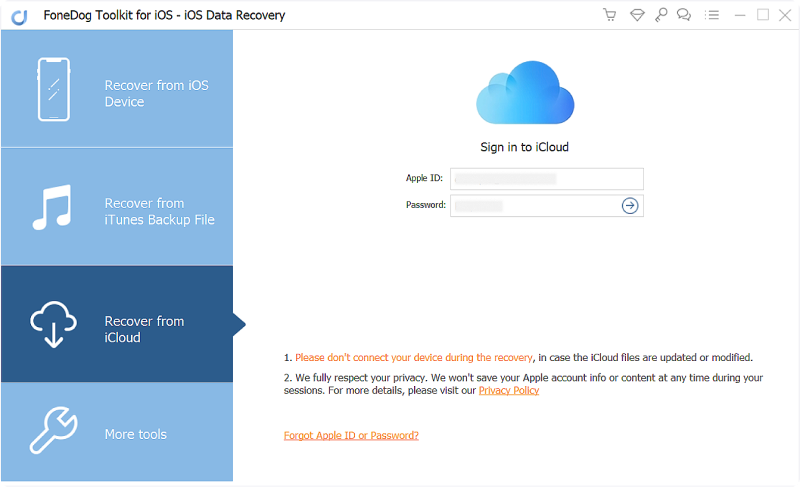
Step 1: Sign in to iCloud Account
Connect your device into the computer. Make sure the FoneDog iOS Toolkit is already open before doing so. Now on the left panel, click on Odzyskaj z pliku kopii zapasowej iCloud. Next, sign in to your iCloud account by entering your Apple ID and password.
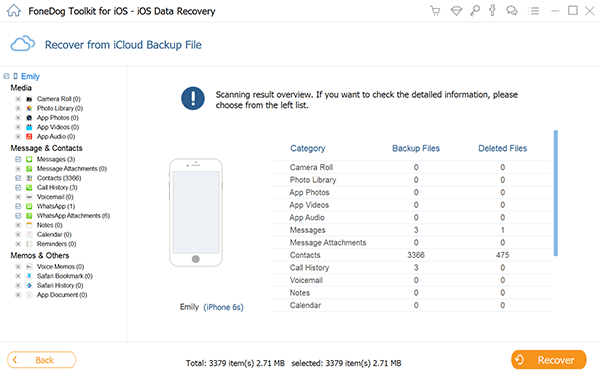
Step 2: Scan and Download Backup File
Once you have logged into the iCloud account, you will be able to see a list of backup files. Simply select the one that you believe contains the photo that you need. Once that’s done, click on the Download button. Wait for a few minutes since it may take a while.
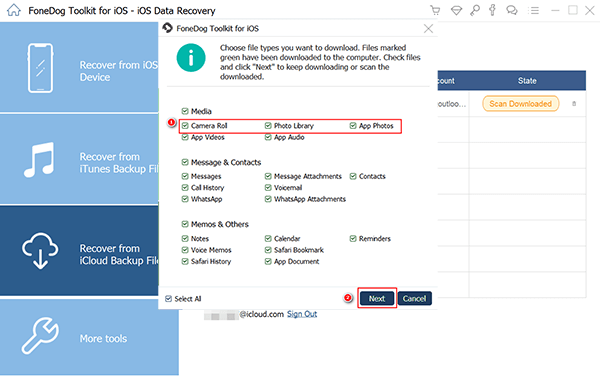
Step 3: Extract Photos to Computer
After you download a local backup file, the system will automatically scan it for files. You will then get sent to the next page with a list of files.
On the left is the file type. There, select among Rolka z aparatu, Photo Librarylub Zdjęcia App. Pictures will then start appearing on the right side. Simply select the ones you want to download. Then, click on wyzdrowieć, navigate to the folder where you want to save them, and click on wyzdrowieć ponownie
You now have the files on your computer. Now all you have to do is launch File Explorer, go to the folder where the photos were saved, then press Ctrl +. That is how to Select All in iCloud Photosusing this tool. It is much harder and takes longer, but it’s very helpful since you don’t have any choice anyway.
Darmowe pobieranieDarmowe pobieranie
Part 2: How to Deselect in iCloud Photos
Although you have worked hard to be able to learn how to Select All in iCloud Photos, not everything will go as planned. That is why you have to have a contingency plan if things go wrong. The best contingency would be how to deselect your photos.
This is very useful if you’ve worked hard selecting the photos and then slipped up and now you want to deselect some or all of the photos. Since this is not known by many, it would be quite beneficial. Here’s how you can do it:
- While all of the photos are selected, hold the Ctrl key on your keyboard.
- Select the one that you want to deselect. This will remove that file from being selected.
- Now if you want to deselect all of them, simply click on the Odznacz button at the top-right corner of the window.
Uwaga: You may also press Ctrl + A to deselect all photos at once without clicking any button on the iCloud platform.
If the Select All function on iCloud was recently added, then the Deselect All is even more of a recent development. As such, you may not find this function even though you were able to select all photos at once. Now if not any of these functions appear to be available to you, perhaps a different approach on how to Select All in iCloud Photos would be more suitable.
Część 3: Wniosek
No one wants to visit their iCloud storage and see a lot of their photos unmanaged. After all, without properly managing your photos, there is a higher chance that they will get lost permanently.
However, it won’t be easy. You first have to learn how to Select All in iCloud Zdjęcia, but that shouldn’t be a problem now that you’ve seen this article. Anyway, make sure to make good use of this guide to properly manage your photos.
Zostaw komentarz
Komentarz

Specjalizacja techniczna w zakresie pisania scenariuszy na PC / YouTube / optymalizacji witryny
Jedną z moich pasji jest tworzenie własnego oprogramowania
Piszę artykuły, aby dzielić się wiedzą na temat technologii IT i trochę doświadczenia w tworzeniu własnego oprogramowania, a tworzenie własnego oprogramowania jest jedną z moich pasji do pracy.
iOS Odzyskiwanie danych
3 Metody odzyskiwania usuniętych danych z iPhone'a lub iPada.
Darmowe pobieranie Darmowe pobieranieGorące artykuły
- Jak przeglądać i odzyskiwać usunięte zdjęcia z kopii zapasowej iTunes?
- Odzyskiwanie iTunes: Jak odzyskać zdjęcia z kopii zapasowej iTunes
- Aktualizacja iOS Usunięte zdjęcia, jak odzyskać
- Jak odzyskać usunięte zdjęcia bezpośrednio z iPhone'a?
- Jak odzyskać utracone zdjęcia po aktualizacji iOS 11
- iCloud Photo Recovery: najlepszy przewodnik, aby to zrobić.
 /
/
CIEKAWYDULL
/
PROSTYTRUDNY
Dziękuję Ci! Oto twoje wybory:
Doskonały
Ocena: 4.7 / 5 (na podstawie 59 oceny)