Kompletny przewodnik na temat wysyłania wiadomości e-mail z telefonu iPhone
Adela D. Louie, Ostatnia aktualizacja: 11 maja 2020 r
Wondering if there is a way for you to send your text messages from iPhone using your email? Do you want to know how you can do this? If so, then this post is for you because we are going to show you a way on how to email text messages from iPhone.
Nowadays, using your iPhone device, you will actually have your text messages be sent over to another phone using your email. This is known to be one of the easiest for you to send your text messages.
However, not all iPhone users know that they can do this process. Maybe because you are new to the iPhone world or for some other reason. That is why in this post, we are going to show you how to email text messages from iPhone the easiest way. So, if you want to know more about how you can do this, then all you have to do is to read on this post until the very end.
Part 1: How to Email Text Messages from iPhone via Messaging ApplicationPart 2: How to Email Text Messages from iPhone – Two Bonus TipPart 3: A Quicker Way on Transferring Text Messages from iPhoneCzęść 4: Wniosek
Part 1: How to Email Text Messages from iPhone via Messaging Application
One way for you to email your text messages from your iPhone is by using the Messages application itself. And for you to know how you can do this process, here is a simple guide that you can follow.
- Step 1: On your iPhone, go ahead and navigate to your Messages application and then go to the conversation that you would like to send via email.
- Step 2: From there, go ahead and press and hold the message that you want to send.
- Step 3: Then a pop-up menu will appear at the bottom of your screen. So, on the box, go ahead and tap on the More option.
- Step 4: And then from there, you are now able to choose all of the messages that you would like to send using your email.
- Step 5: And once that you are done choosing the messages that you want; you can now go ahead and tap on the Forward button which can be found at the lower-right hand corner of your screen.
- Step 6: Then on the next page, simply enter the email address where you want to send those text messages and then tap on the Send button. Then you can simply access the email on another device or on your computer as well.
Part 2: How to Email Text Messages from iPhone – Two Bonus Tip
Bonus #1: Using Screenshots
Another simple way that you can send your text messages through emailing them is by simply using the screenshot feature of your iPhone device. However, this process is only applicable if you only have a few messages that you want to send over through the use of your email.
The process of this is very simple. All you need to do is to go to the conversation that you would like to send via email. And then, go ahead and take a screenshot on your iPhone on every part of the conversation that you want to send. Then, these screenshots will be saved as an image on your iPhone device. So, what you will be needing now is to attach this screenshot to the email that you are going to forward and then tap on the Send button for you to have it sent over to the email address that you want. It is obvious that simple.
Bonus #2: Copy & Paste
Now, in case that you also have the Messages application installed on your mak, then you will also be able to look for the messages thread or conversation from there because it will also be stored on your Messages application. From there, you can easily do a copy and paste process. However, doing this process, you will not be able to get the time stamp for each message. But on the other hand, those messages will be labeled with a certain name from where you received your text messages.
Part 3: A Quicker Way on Transferring Text Messages from iPhone
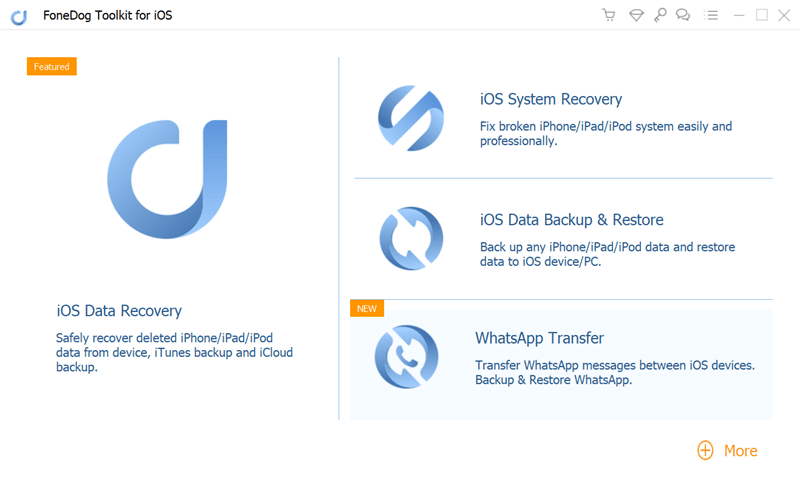
If what you are aiming for is to transfer your text messages from your iPhone to another device, or just simply keep them for backup, then there is another way on how you can do this. One process that will definitely help you in backing up your text messages and at the same time, restoring them over to another smartphone device. And that process includes using the FoneDog iOS Backup i przywracanie danych.
Kopia zapasowa i przywracanie danych w systemie iOS
Jedno kliknięcie, aby wykonać kopię zapasową całego urządzenia iOS na komputerze.
Umożliwia podgląd i przywracanie dowolnego elementu z kopii zapasowej na urządzenie.
Eksportuj, co chcesz, z kopii zapasowej na komputer.
Brak utraty danych na urządzeniach podczas przywracania.
Przywracanie iPhone'a nie spowoduje zastąpienia danych
Darmowe pobieranie
Darmowe pobieranie

The FoneDog iOS Data Backup and Restore is known as a backup and restores tool that every iPhone user can rely upon whenever they want to transfer any of their data from their iPhone to their computer or to another iPhone device. This includes the text messages that they have on their iPhone device. And aside from the text messages, you can also be able to have other data send or transferred over to another device such as photos, videos, contacts, and so much more. And using the FoneDog iOS Data Backup and Restore you will be able to preview your data first before restoring them from your backup file. This way, you will be able to be sure that you are going to get the right data that you want.
Now, for you to know how you can use the FoneDog iOS Data Backup and Restore, here is a quick guide that you can follow.
#1: Backup Text Messages on iPhone
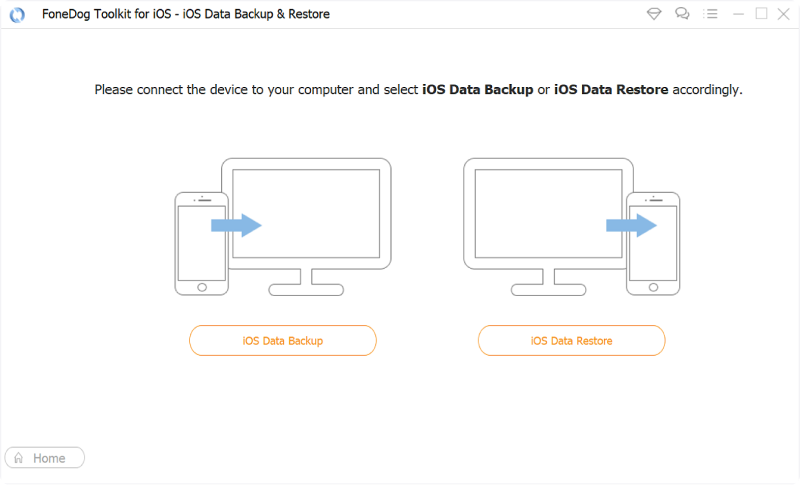
Step 1: Launch and Connect iPhone
The first thing that you need to do after downloading and installing the FoneDog iOS Data Backup and Restore is to launch it on your computer. And then, go ahead and have your iPhone device plugin to your computer using its USB cable.
Step 2: Choose Data Backup
Then, on the main page of the program, go ahead and select on iOS Data Backup option. And once that you click on that, you will then be able to take to the next page.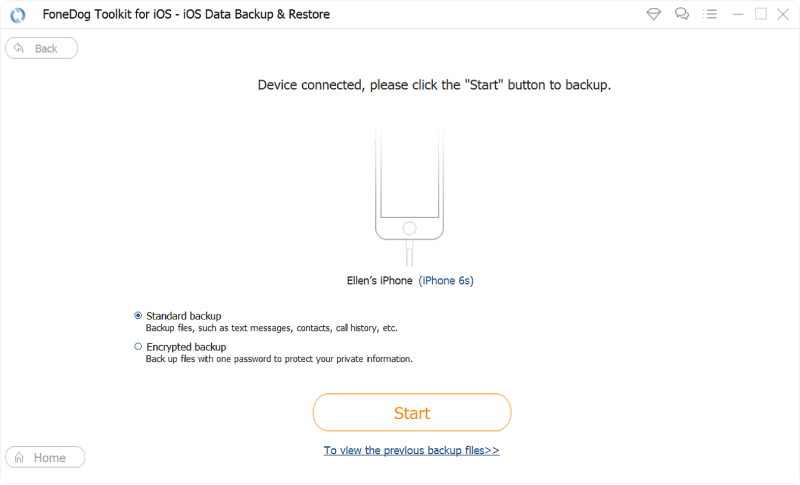
Step 3: Select the Desired Backup Mode
Then, on the next page of the program, you can now choose the type of backup mode. In this part, there are two backup modes that you can choose from. One is the Standard Backup Mode and the other one is the Encrypted Backup. The Encrypted Backup mode is where you input a certain passcode for your backup file. So, from here, choose the backup mode that you want and then click on the Start button for you to proceed to the next step.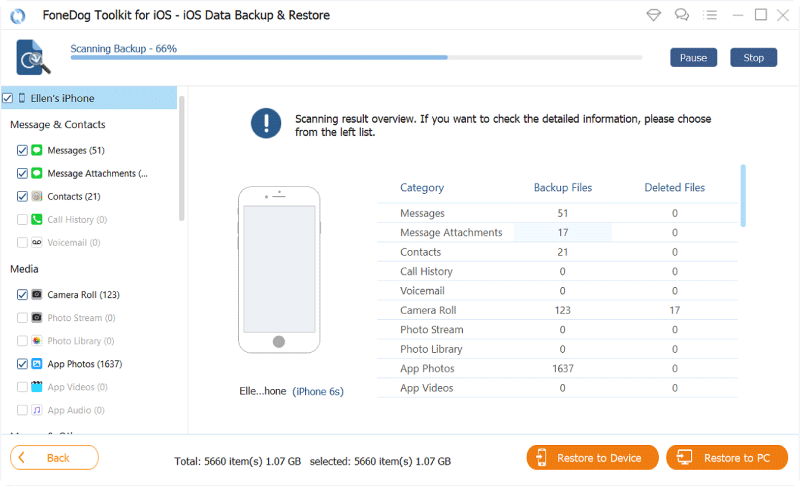
Step 4: Choose Text Messages to Backup
Then on the page, you will be able to see all of the data that the program supports to backup. So, all you need to do is to choose the file type that you want to backup. Since that we are working on your text messages, all you need to do is to click on the Messages & Attachments. After that, go ahead and click on the Next button.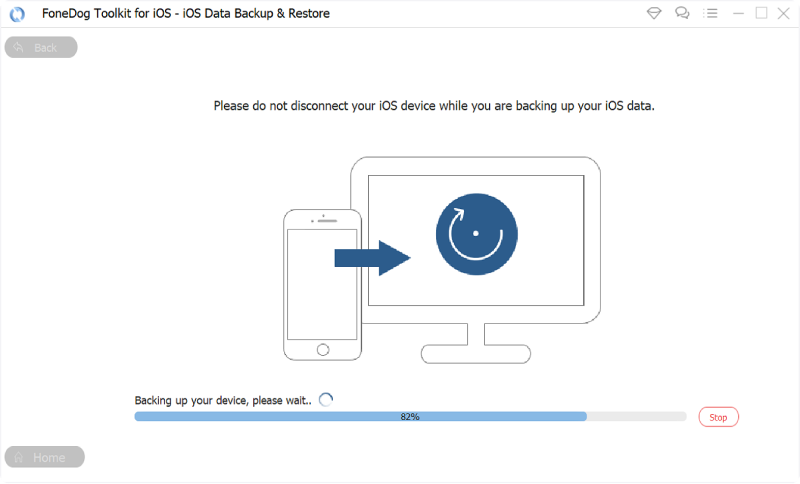
Step 5: Complete Text Messages Backup
After clicking on the Next button, the FoneDog iOS Data Backup and Restore will then begin to back up your text messages so all you need to do is to wait for it to complete. And once that the process is done, you will be able to see the size of the backup file that you just made.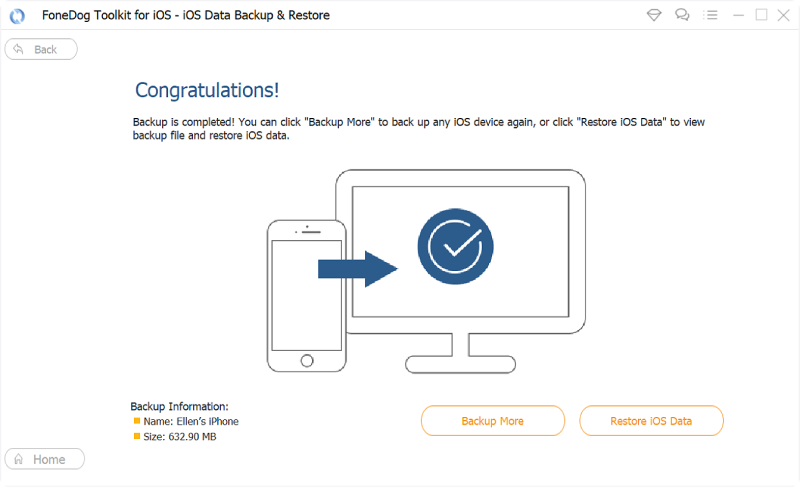
#2: Restore Text Messages on Other Device
Teraz, kiedy już masz kopia zapasowa your text messages, here is a guide for you to follow in the case that you want to restore them over to another device.
Step 1: Plugin Device and Choose iOS Restore
Go ahead and launch the program on your computer and then have your other device connected to it using its USB cable. Then on the main page of the program, go ahead and select the iOS Data Restore from the options on your screen.
Step 2: Choose Your Recent Backup File
Then on the next page, the FoneDog iOS Data Backup and Restore will show you a list of backup files that you have on your computer. So, from that list, go ahead and choose the most recent one that you have just made. Here, you can base it according to the time and date that the backup file was made.
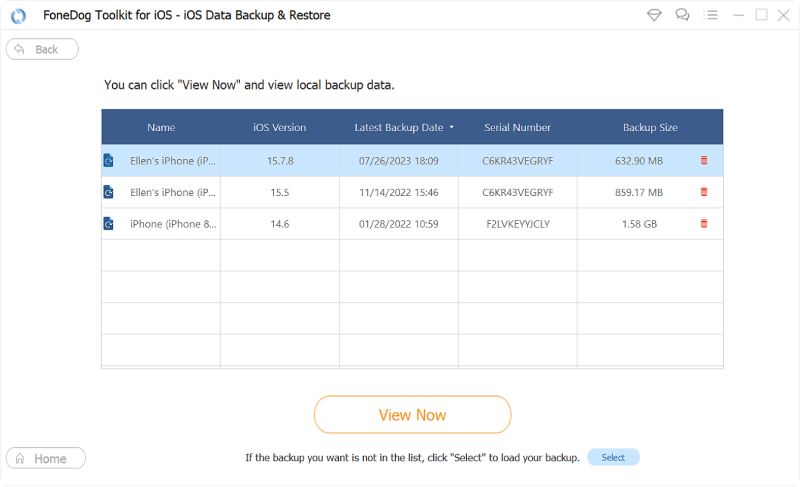
Krok 3: Przeskanuj plik kopii zapasowej
After choosing the backup file from the list, go ahead and click on the View Now button. The FoneDog iOS Data Backup and Restore will then start to scan your backup file so all you need to do is to wait for it to finish.
Step 4: Choose Text Message to Restore
Then, after the scanning is complete, you can now go ahead and click on the Messages option from the left side of your screen and all of the text messages that you have backed up will show on the right side of your screen. Here, you can simply preview your text messages and then choose those that you want to restore. You can do this by putting a checkmark beside each text messages to select them.
Step 5: Restore Your Text Messages
And after you are done choosing the text messages of your choice, you can now go ahead and click on either Restore to PC option if you want to restore them on your computer, or you can choose the option Restore to Device if you want to restore it to another device. Then wait for it to finish the process. And once done, you will be able to see those text messages where you have restored it to.
Kopia zapasowa i przywracanie danych w systemie iOS
Jedno kliknięcie, aby wykonać kopię zapasową całego urządzenia iOS na komputerze.
Umożliwia podgląd i przywracanie dowolnego elementu z kopii zapasowej na urządzenie.
Eksportuj, co chcesz, z kopii zapasowej na komputer.
Brak utraty danych na urządzeniach podczas przywracania.
Przywracanie iPhone'a nie spowoduje zastąpienia danych
Darmowe pobieranie
Darmowe pobieranie
Część 4: Wniosek
It is really easy on how to email text messages from an iPhone device. All you need to do is to follow the guide that we have shown you above and you will be able to have it done in such a small amount of time. But, if what you are aiming for is to have your text messages backed up, then you can simply use the FoneDog iOS Data Backup and Restore and you will be able to do it in a safe, quick, and efficient way.
Zostaw komentarz
Komentarz

Tech WWW Pisanie / Optymalizacja treści
Śpiewa, uśmiecha się, zaskakuje każdego dnia!
Tak więc, jako pisarz techniczny, moim obowiązkiem jest gromadzenie skutecznych i niezawodnych rozwiązań, aby odpowiedzieć na pytania dotyczące radzenia sobie z problemami związanymi z urządzeniami.
iOS Data Backup & Restore
Wykonaj kopię zapasową danych na komputerze i selektywnie przywróć dane iOS z kopii zapasowych.
Darmowe pobieranie Darmowe pobieranieGorące artykuły
- Jak wykonać kopię zapasową kontaktów na iCloud
- 3 Opcje synchronizacji kontaktów z iPhone'a na Maca
- Jak wykonać kopię zapasową wiadomości tekstowych z iPhone'a na Gmaila?
- Jak wykonać kopię zapasową wiadomości SMS z telefonu iPhone
- Kopia zapasowa i przywracanie wiadomości SMS na urządzeniu iPhone
- Jak wykonać kopię zapasową wiadomości iPhone'a bez iTunes?
 /
/
CIEKAWYDULL
/
PROSTYTRUDNY
Dziękuję Ci! Oto twoje wybory:
Doskonały
Ocena: 4.8 / 5 (na podstawie 84 oceny)